
Sunday, October 23, 2011

Monday, October 17, 2011
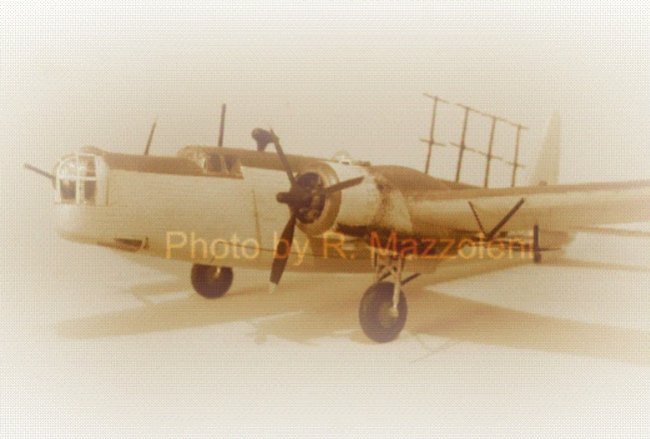
The Airfix 1/72nd scale Westland Lyslander Part 3
I suddenly realized that I had never finished this blog, although I had finished the model some time ago.
Here are the photos of the final process of the model, all that is missing is the applying of decals, and I will post photos of the Lyslander with markings a bit later.

 First wing assembly in place.
 First wing assembly, wing brace, landing assembly and tail stabilizer in place.


Here are the photos of the final process of the model, all that is missing is the applying of decals, and I will post photos of the Lyslander with markings a bit later.

The model has been prepainted, and assembled with rear gunners station complete, forward pilots cockpit and radio assembly in place and engine assembly together, the wings have been painted and are ready to assemble here.


Both wings with braces and landing gear resting as glue sets up.

Aft angle shot of the Lyslander, missing only its markings now.

Front photo showing the landing gear assembly, wing supports and bomb mounts on the landing gear.

Second shot showing Lyslander from rear angle.

Side profile shot.
The Lyslander model was completed in June of this year, and was an interesting model overall to build, it is a simple enough kit and a good one for a first time model builder to cut his or her teeth on. There is a variety of information available on line about this aircraft and its' service both in the China Burma and India conflict, as well as use in North Africa and as a spy courier from England to France.
Remember there are all kinds of interesting aircraft that served in World War 2, not every one was a fighter or a bomber, so keep your eyes pealed.
Til next time, Happy Model Building.
Sunday, October 16, 2011
A Challenge the Airfix Vickers Wellington in 1/72nd Scale. Part Two
In Part One I mentioned I was working to build my Wellington, as a U-Boat hunter with Coastal Command, well that was the initial plan. Sometimes, you realize that what you intend, and what you end up doing are two different things.
The paint scheme was unique for a British bomber, the sides and lower surfaces are Gloss white, instead of the standard Gloss Black. But I was running into a problem, painting white over medium gray is difficult, in not impossible, oh it can be done with multiple coats of paint. The problem is each coat leads to a certain amount of streaks and in some cases bled through causing you to add additional layers, leading to streaks and a tacky appearance.
Since this will be part of a display at the Jefferson County Public Library at the beginning of January of next year, I had to make a decision, attempt to rectify this and push through with a lot of scrap building of radar masts and a leigh light, or find an alternate paint scheme that would still be interesting and not the standard Brown, Green and Black scheme of Bomber command.
Last week, I found the scheme, it is still a night bomber scheme, but for Wellingtons used in North Africa. Because these planes were used in the desert they have a two tone brown scheme on the upper surfaces, which is very different than how one sees this plane.
The nice thing about using acrylic paints over oil based, you can clean off the paint with a little warm water a wash cloth and some dish soap. In a few minutes you can strip your model down to the base color and start from scratch without any loss of detail or damaging any clear parts already in place.
Here are some pictures of the model as it was appearing, next time I will have some photos with the new paint scheme under way.
Enjoy.


Tuesday, October 4, 2011
A challenge... The Airifix 1/72nd Scale Vickers Wellington
About a month ago, I began my most recent model, the Airifix 1/72nd Scale model of the Vickers Wellington bomber, from World War Two. The Wellington, was a medium range bomber, used at the beginning of the war to bomb NAZI targets in the lowlands, France, Poland and such.

The model above represents an early war version of the Wellington used by Coastal Command.
It was also used by coastal Command, Coastal Command, was responsible for protecting the merchant fleet from the German U-boats and they used a wide array of aircraft. The Wellington was adapted to this job by carrying radar and sonar, as well as Leigh light that it could shine down upon an enemy submarine, so it could drop bombs, depth charger or torpedoes, to sink the U-boat.
The model I am building was a standard model of the Wellington, it came with two sets of decals for aircraft of Bomber Command, and limited internal details.
However I decided to build the model as a plane from Coastal Command, because this would be unique in appearance and require more work.
What I did not expect was how much work there would be with just the kit itself. Remember, when I built this model originally, it was one of the Old MPC kits, which was an American reissue of the British kit, a lot of things were different. Such as that the engine assembly was one solid piece in the MPC kit. With the Airifix kit, you cement each exhaust stack on the engine cylinder, there are eight stacks that go around the cylinder and prop hub. Each is about the size of a toothpick cut off at about a half an inch from top to bottom and about a tenth as wide.
However once you get comfortable working with the small parts it is easy to assemble the engine assembly.
The gun turrets are also a challenge,. more small parts, including the gun mounts. Unlike the MPC kit, whee the guns could be raised and lowered, and which had flight crew figures; the Airifix kit has no flight crew figures and the guns are glued in place.
The cockpit assembly goes together easily, but again lacks the pilot and navigator figure.
Finding good information on color schemes can be challenging, even using Google or Yahoo to pull images, very few color photos exist of the Wellington's that flew with Coastal Command, and the few that do exist are from end war models, which had an entirely different layout in the forward fuselage.
Depending on what pictures you find, the camouflage for the Wellington was either.
Upper Surfaces and Wings Intermediate Gray and Flat Black patches,
Lower Fuselage and Wings Gloss White.
Upper Surfaces Dark Blue Gray and Dark Olive Drab
Upper surfaces side panels tail Off White
Lower Surfaces Flat Black
Also some versions of the Wellington, that served in 1944 had a radar dome under the nose and the tail assembly was white as well.
Next time I shall have photos of the model.
Till then Happy Model Building.
Photos

Two versions of the Wellington shown here. the outer model shows the Wellington, in standard Bomber Command Camouflage, the inner model shows the Wellington with a radar mount under the nose assembly and in camouflage and markings for Coastal Command from 1944.

Late War Wellington with the Radar blister under the nose and displaying they Leigh Light used to spot enemy submarines on the surface at night.

Early War Wellington, before being equipped with all the flying Sonar and Radar equipment.
What I hope my model looks like when I have finished her.
The model above represents an early war version of the Wellington used by Coastal Command.
It was also used by coastal Command, Coastal Command, was responsible for protecting the merchant fleet from the German U-boats and they used a wide array of aircraft. The Wellington was adapted to this job by carrying radar and sonar, as well as Leigh light that it could shine down upon an enemy submarine, so it could drop bombs, depth charger or torpedoes, to sink the U-boat.
The model I am building was a standard model of the Wellington, it came with two sets of decals for aircraft of Bomber Command, and limited internal details.
However I decided to build the model as a plane from Coastal Command, because this would be unique in appearance and require more work.
What I did not expect was how much work there would be with just the kit itself. Remember, when I built this model originally, it was one of the Old MPC kits, which was an American reissue of the British kit, a lot of things were different. Such as that the engine assembly was one solid piece in the MPC kit. With the Airifix kit, you cement each exhaust stack on the engine cylinder, there are eight stacks that go around the cylinder and prop hub. Each is about the size of a toothpick cut off at about a half an inch from top to bottom and about a tenth as wide.
However once you get comfortable working with the small parts it is easy to assemble the engine assembly.
The gun turrets are also a challenge,. more small parts, including the gun mounts. Unlike the MPC kit, whee the guns could be raised and lowered, and which had flight crew figures; the Airifix kit has no flight crew figures and the guns are glued in place.
The cockpit assembly goes together easily, but again lacks the pilot and navigator figure.
Finding good information on color schemes can be challenging, even using Google or Yahoo to pull images, very few color photos exist of the Wellington's that flew with Coastal Command, and the few that do exist are from end war models, which had an entirely different layout in the forward fuselage.
Depending on what pictures you find, the camouflage for the Wellington was either.
Upper Surfaces and Wings Intermediate Gray and Flat Black patches,
Lower Fuselage and Wings Gloss White.
Upper Surfaces Dark Blue Gray and Dark Olive Drab
Upper surfaces side panels tail Off White
Lower Surfaces Flat Black
Also some versions of the Wellington, that served in 1944 had a radar dome under the nose and the tail assembly was white as well.
Next time I shall have photos of the model.
Till then Happy Model Building.
Photos
Two versions of the Wellington shown here. the outer model shows the Wellington, in standard Bomber Command Camouflage, the inner model shows the Wellington with a radar mount under the nose assembly and in camouflage and markings for Coastal Command from 1944.
Late War Wellington with the Radar blister under the nose and displaying they Leigh Light used to spot enemy submarines on the surface at night.
Early War Wellington, before being equipped with all the flying Sonar and Radar equipment.
What I hope my model looks like when I have finished her.
Subscribe to:
Posts (Atom)