
About a month ago, I began my most recent model, the Airifix 1/72nd Scale model of the Vickers Wellington bomber, from World War Two. The Wellington, was a medium range bomber, used at the beginning of the war to bomb NAZI targets in the lowlands, France, Poland and such.

The model above represents an early war version of the Wellington used by Coastal Command.
It was also used by coastal Command, Coastal Command, was responsible for protecting the merchant fleet from the German U-boats and they used a wide array of aircraft. The Wellington was adapted to this job by carrying radar and sonar, as well as Leigh light that it could shine down upon an enemy submarine, so it could drop bombs, depth charger or torpedoes, to sink the U-boat.
The model I am building was a standard model of the Wellington, it came with two sets of decals for aircraft of Bomber Command, and limited internal details.
However I decided to build the model as a plane from Coastal Command, because this would be unique in appearance and require more work.
What I did not expect was how much work there would be with just the kit itself. Remember, when I built this model originally, it was one of the Old MPC kits, which was an American reissue of the British kit, a lot of things were different. Such as that the engine assembly was one solid piece in the MPC kit. With the Airifix kit, you cement each exhaust stack on the engine cylinder, there are eight stacks that go around the cylinder and prop hub. Each is about the size of a toothpick cut off at about a half an inch from top to bottom and about a tenth as wide.
However once you get comfortable working with the small parts it is easy to assemble the engine assembly.
The gun turrets are also a challenge,. more small parts, including the gun mounts. Unlike the MPC kit, whee the guns could be raised and lowered, and which had flight crew figures; the Airifix kit has no flight crew figures and the guns are glued in place.
The cockpit assembly goes together easily, but again lacks the pilot and navigator figure.
Finding good information on color schemes can be challenging, even using Google or Yahoo to pull images, very few color photos exist of the Wellington's that flew with Coastal Command, and the few that do exist are from end war models, which had an entirely different layout in the forward fuselage.
Depending on what pictures you find, the camouflage for the Wellington was either.
Upper Surfaces and Wings Intermediate Gray and Flat Black patches,
Lower Fuselage and Wings Gloss White.
Upper Surfaces Dark Blue Gray and Dark Olive Drab
Upper surfaces side panels tail Off White
Lower Surfaces Flat Black
Also some versions of the Wellington, that served in 1944 had a radar dome under the nose and the tail assembly was white as well.
Next time I shall have photos of the model.
Till then Happy Model Building.
Photos

Two versions of the Wellington shown here. the outer model shows the Wellington, in standard Bomber Command Camouflage, the inner model shows the Wellington with a radar mount under the nose assembly and in camouflage and markings for Coastal Command from 1944.

Late War Wellington with the Radar blister under the nose and displaying they Leigh Light used to spot enemy submarines on the surface at night.

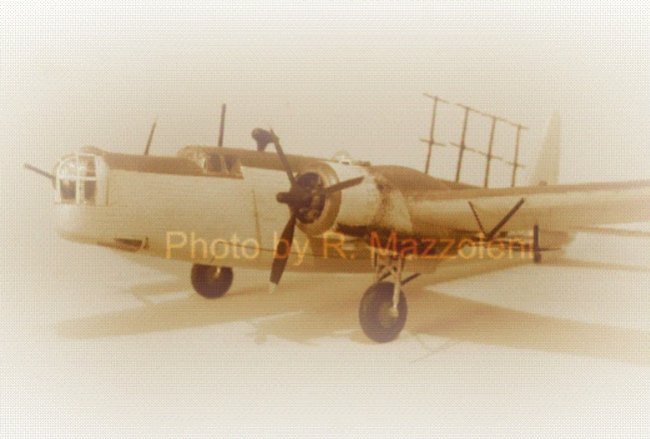
Early War Wellington, before being equipped with all the flying Sonar and Radar equipment.
What I hope my model looks like when I have finished her.
The model above represents an early war version of the Wellington used by Coastal Command.
It was also used by coastal Command, Coastal Command, was responsible for protecting the merchant fleet from the German U-boats and they used a wide array of aircraft. The Wellington was adapted to this job by carrying radar and sonar, as well as Leigh light that it could shine down upon an enemy submarine, so it could drop bombs, depth charger or torpedoes, to sink the U-boat.
The model I am building was a standard model of the Wellington, it came with two sets of decals for aircraft of Bomber Command, and limited internal details.
However I decided to build the model as a plane from Coastal Command, because this would be unique in appearance and require more work.
What I did not expect was how much work there would be with just the kit itself. Remember, when I built this model originally, it was one of the Old MPC kits, which was an American reissue of the British kit, a lot of things were different. Such as that the engine assembly was one solid piece in the MPC kit. With the Airifix kit, you cement each exhaust stack on the engine cylinder, there are eight stacks that go around the cylinder and prop hub. Each is about the size of a toothpick cut off at about a half an inch from top to bottom and about a tenth as wide.
However once you get comfortable working with the small parts it is easy to assemble the engine assembly.
The gun turrets are also a challenge,. more small parts, including the gun mounts. Unlike the MPC kit, whee the guns could be raised and lowered, and which had flight crew figures; the Airifix kit has no flight crew figures and the guns are glued in place.
The cockpit assembly goes together easily, but again lacks the pilot and navigator figure.
Finding good information on color schemes can be challenging, even using Google or Yahoo to pull images, very few color photos exist of the Wellington's that flew with Coastal Command, and the few that do exist are from end war models, which had an entirely different layout in the forward fuselage.
Depending on what pictures you find, the camouflage for the Wellington was either.
Upper Surfaces and Wings Intermediate Gray and Flat Black patches,
Lower Fuselage and Wings Gloss White.
Upper Surfaces Dark Blue Gray and Dark Olive Drab
Upper surfaces side panels tail Off White
Lower Surfaces Flat Black
Also some versions of the Wellington, that served in 1944 had a radar dome under the nose and the tail assembly was white as well.
Next time I shall have photos of the model.
Till then Happy Model Building.
Photos
Two versions of the Wellington shown here. the outer model shows the Wellington, in standard Bomber Command Camouflage, the inner model shows the Wellington with a radar mount under the nose assembly and in camouflage and markings for Coastal Command from 1944.
Late War Wellington with the Radar blister under the nose and displaying they Leigh Light used to spot enemy submarines on the surface at night.
Early War Wellington, before being equipped with all the flying Sonar and Radar equipment.
What I hope my model looks like when I have finished her.
Hi,
ReplyDeleteI found you post after trawling through google looking for pictures of Wellingtons used by costal comand during late 42 to mid 43. My grandfather was in the 458 squadron using the Wellington Mk VIII.
You are correct there is very little infromation & photos on the coastal comand wellington bombers. Im very interested in your project and would love to see the progress.
I have just received a Wellington book with details of Camo & markings for each model, some good information.
My email is nickbert_81@hotmail.com if you need anymore infomation on you model.
All the best
Nick